Gene Drawer
Gene drawer was designed to create scaled pictures of the exonic structure of a gene as shown
in figure 1.
 This program can be downloaded
here. This program can be downloaded
here.
Computer requirements
This program runs on Microsoft Windows, using the .NET 2.0 environment which can be obtained from
here.
Gene Drawer user guide
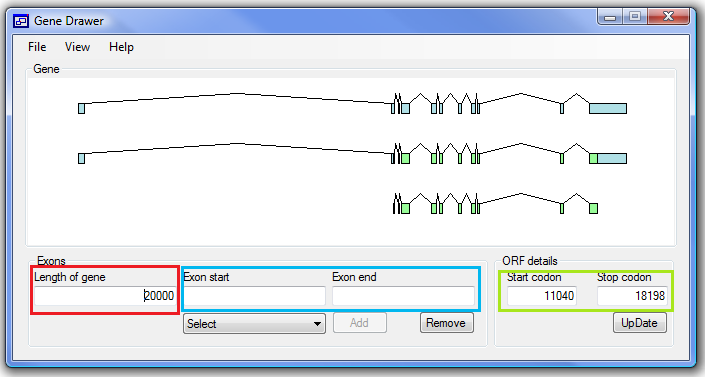
Figure 1
The data can be entered either manually or from a correctly structured file.
Entering data manually
Before entering any exonic data, you must enter the length of the gene in the first text box
(in the red box in the figure).
Once this has been entered you can start to add exons,
by adding the genomic positions of the splice sites in the ‘Exon start’ and ‘Exon
end’ text boxes (blue box in the figure). The word ‘Error’ will appear in red above
the text boxes if a splice site position is outside the gene region (greater than
the gene length) or the is 5’ site position is greater than the 3’ sites’ position.
If everything is correct the ‘Add’ button below the ‘Exon end’ box will be enabled
and clicking it will add the exon. Repeat the process for each exon, if you need
to delete an exon, select the exon using the list of exons below the ‘Exon start’
box and press the ‘Remove’ button.
Once all the exons have been added the picture will show
the basic structure of the gene, but no coding sequences are shown. To add the coding
sequences enter the genomic positions of the start and stop codons in to the boxes
in the ‘ORF details’ panel (green box in the figure) and press the ‘Update’ button.
If these positions are found in exons the coding sequence is shown.
Saving the data to file and entering saved data
Once data has been entered it can be saved to file by
selecting the ‘File’ > ‘Save as…’ menu option and supplying a file name. Similarly,
selecting the ‘File’ > ‘Open…’ and picking a file will enter data from an output
file (Example file). To save a copy of the image select
‘File’ > ‘Save picture as…’ and enter the filename. This will save the picture as
a ‘*.png’ file which can be viewed in most graphic enabled programs.
Changing the colour of the exons
Selecting the ‘View’ > ‘Gene colour’ options display
a colour selecting dialog box to be displayed. Selecting a colour on this form and
pressing ‘OK’ will change the fill colour of the exonic sequences. Selecting the
‘View’ > ‘ORF colour’ option will change the coding sequence fill colour.
|